Showing posts with label garage. Show all posts

Sunday, January 19, 2014

Garage Cabinets, Part Deux


I wanted to get some large items off the floor, so designed another over-sized set of cabinets to fill in some poorly-used space by the water softener.

Step 1: Build a rather large box out of 1/2" plywood. This one is 4' x 29" x 20" (exterior, nominal).

Step 2: Build another (matching) box and install mounting rails in each so the boxes can be attached to wall studs.


Step 3: Install cleats on the wall and provide a temporary support to hold the lower box while it is screwed into the studs.


Step 4: After mounting the box to the studs, frame out the remaining two sides of the base with 2x4. The next picture shows how this will be used to provide "overkill" in terms of load-handling capacity.

Notice how my original cleats are protruding slightly beyond the bounds of the box. This was done intentionally to allow each cleat to be attached to one additional stud.


Step 5: Stack the second box on top of the first, and secure it to the studs.

Step 6: Line up a vertical support that extends to the ceiling. Cut a cross member long enough to attach to two joists, then attach the vertical support to the cross member. Verify that the assembly is level, then attach the vertical support to the base 2x4 frame of the cabinet assembly. Finally, attach the boxes to the vertical support. This support ensures that the cabinets can hold just about anything you could possibly throw at them.


Step 7: Step back and take a breather, everything is in place and leveled off.


Step 8: Try not to worry too much about any minor imperfections; it's more productive to build a face frame and hide them instead. So, that's what we'll do next...


Step 9: Cut and install the face frame. Because of my long cleat on the wall, it was necessary to notch out a piece of the frame on the lower left corner. (Unfortunately, this detail is hidden in the picture below.) Without the end grain of the plywood exposed, the cabinet not only looks better, but is more durable.

Step 10: Load the cabinet with a bunch of junk indispensable items and call it a day. 

Sunday, June 23, 2013

Garage Workbench Construction

I wanted to show this sequentially, with inline images, so decided to post it over here instead of just using Google+.

Here's a step-by-step of the second phase in my construction project.

1. Cut and notch the base cabinet side panels.

2. Cut the lower front facia, and the mid and rear under-cabinet supports.  
    *NOTE*: The plywood scraps from the notches are used to confirm measurements.

3. Cut the bottom (shorter) and top (longer) of the cabinet. These parts should match the measurements of the one-by material cut in step 2.

4. Using a scrap the same thickness as the back panel, set the blade height for some rabbets.

5. Cut the rabbets on the top of the bottom shelf, the bottom of the cabinet top, and the inside of each side panel. (You could use a router to cut the rabbets, but -- as you'll see in the next step -- this method is pretty good for plywood.)

6. Since the depth of the shoulder cuts was about the same as one of the lamination layers within the plywood, it is quick and easy to clear the rest of the rabbets with a chisel.

7. Attach the back and middle supports to the underside of the bottom shelf.

8. Attach one of the side panels.
    *NOTE*: The square was used to align the nails.

9. Attach the other side in a similar manner, then attach the front fascia.

10. Nail through the bottom shelf to the front fascia to provide more strength.

11. Attach the top, then cut the back panel and insert it into the rabbets.

12. Cut the two rails and two stiles for the cabinet's face frame. Glue and nail the face frame to the plywood structure of the cabinet.

13. In order to increase clearance in the toe space, trim some material from the lower face frame before attaching this piece.

14. Congratulations, you have a base cabinet.  Lather, rinse, repeat...

15. Modern fancy laser technology helps cut two-by lumber for the bench top.

16. Cut and attach all of the pieces for the bench top. Be sure to slightly overlap the front edge of the cabinet bases, to make it look "right". Optionally, add a "backsplash" to help secure work pieces, and to keep parts from getting lost.

17. This puppy is strong enough to stand on top of. If you don't have a jointer, then you'll have to suffer the slings and arrows of minor gaps caused by imperfections in the two-by lumber. A sheet of melamine, MDF, or even some filler can compensate for this later...

18. This particular framing square makes a fine grey card for setting white balance. Include it in all your photos if you want consistent colors :^)

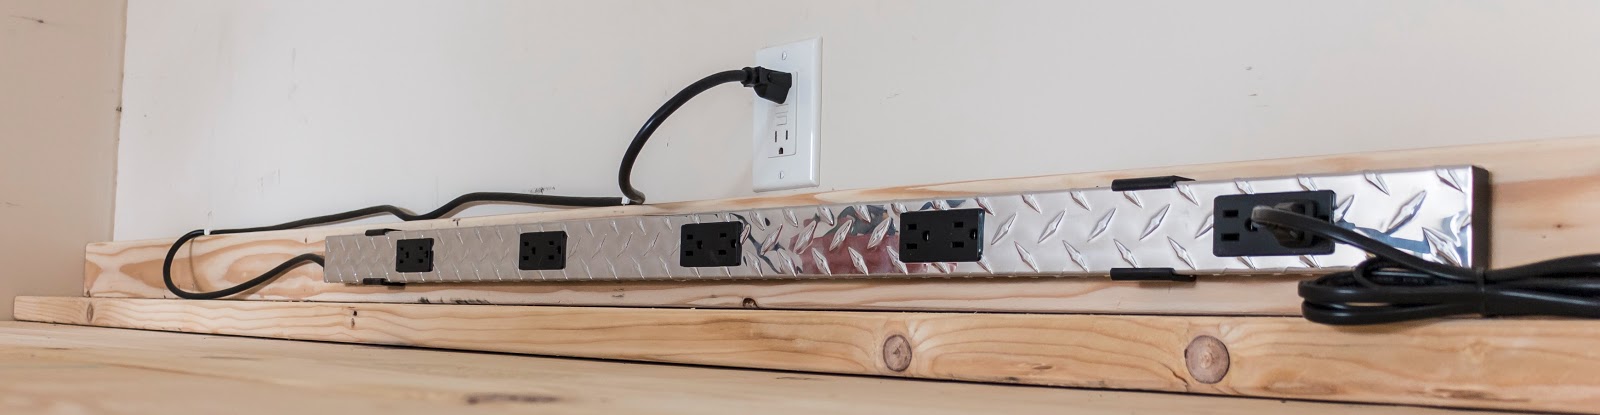
19. Nothing says "man cave" quite like a faux diamond plate power strip.

20. Detail from underneath...

21. If you make your cabinets as large as these, there's plenty of room to relax and fire off a selfie.