Sunday, March 16, 2014

Playing Librarian/Curator Made Easier with Video File Metadata

My video file collection is a mess. There is duplicate content, and files ranging in resolution from 1080p to generic HD to DVD-level and many that are older and even lower than that. Similarly, some have surround sound tracks, and others only have super low-bitrate stereo tracks. I wanted to know what may need to be re-encoded, and to have the ability to sort through the vast volume of data relatively quickly based on various parameters built into the metadata.

This means that I needed to be able to read the metadata, grab some key information from each file, and have the ability to make decisions quickly. For reading the metadata, I chose ffprobe, which is part of the ffmpeg Windows binaries made available from Zeranoe.


Then, I fired up cygwin and used the following bash script to grab the stuff I cared about:

for file in *; 
do ls "$file" >> list.txt;
ffprobe.exe -v quiet -show_streams -show_data -pretty -of json "$file" | egrep codec_name\|width\|height\|bit_rate\|channel_layout\|sample_rate >> list.txt;
done
The double quotes ward off undesirable behavior when the file names have spaces and other characters that would need to be escaped out in them. The sequence of "OR"ed parameters that egrep is filtering from the output are what allow me to find out what I need to know about both the video and audio parts of each file.

Here's an example of the output for two versions of the same source material that were inadvertently created:

VERSION_A.m4v
            "codec_name": "h264",
            "width": 704,
            "height": 384,
            "bit_rate": "863.986000 Kbit/s",
            "codec_name": "aac",
            "sample_rate": "48000 KHz",
            "channel_layout": "stereo",
            "bit_rate": "164.469000 Kbit/s",
VERSION_B.m4v
            "codec_name": "h264",
            "width": 1920,
            "height": 800,
            "bit_rate": "5.983516 Mbit/s",
            "codec_name": "aac",
            "sample_rate": "48000 KHz",
            "channel_layout": "stereo",
            "bit_rate": "198.056000 Kbit/s",
            "codec_name": "ac3",
            "sample_rate": "48000 KHz",
            "channel_layout": "5.1(side)",
            "bit_rate": "640000 Kbit/s",

In this case, there's a clear winner. Version A is "DVD quality" and only contains a stereo soundtrack. Version B is "full HD" and includes not only a slightly higher bit-rate stereo audio track, but also a 5.1 surround audio track. As you can guess, the file sizes are significantly different, so you'd think you can just keep the larger file...  In this case, that would work, but the distinctions are not always so clear, and the data makes the job of curating a bit easier.

With a small amount of work, I should be able to get this output file into a CSV format and then quickly merge, sort, and filter the whole list as a spreadsheet.  

Friday, March 14, 2014

OpenVPN Client on Windows 8.1

After realizing that my L2TP VPN connection wasn't actually working when the PSK was provided, and therefore was not encrypting anything, I decided to implement OpenVPN instead.


I installed the latest OpenVPN x64 Windows client from http://openvpn.net/index.php/open-source/downloads.html and quickly discovered -- to my dismay -- that OpenVPN-GUI.exe would not run properly under Windows 8.1.

Mercifully, others had encountered the same problem and documented the basic and simple fact that the CLI application still functions properly, even if the GUI is completely borked in this version of Windows. They were right, and running openvpn.exe from the command line connects like a champ, and works beautifully.

But, this is windows and therefore I reserve the right to be too lazy to type every time I wish to connect.  So, I created a simple two-line batch file, and stuck a shortcut to it on the desktop. Now I just have to run this shortcut as administrator, check the status messages, and minimize the cmd window until I'm ready to disconnect.

The batch file looks a bit like this, but without the obfuscation listed here:
cd c:\users\USERNAME\documents\openvpn\
cmd /K C:\Progra~1\openvpn\bin\openvpn.exe MYVPNPROFILE.ovpn
As you likely guessed, the connection profile file and its corresponding certificate are contained in the C::\users\USERNAME\documents\openvpn\ directory. The "/K" parameter causes the command prompt window to remain open, which is necessary; the same is true of running the batch file as Administrator.  Terminating the window will drop the TAP network connection which is essential for the VPN to function, but it can be safely and easily minimized. If you don't run as admin, there aren't permissions to build the network connection...

Sunday, January 19, 2014

Garage Cabinets, Part Deux


I wanted to get some large items off the floor, so designed another over-sized set of cabinets to fill in some poorly-used space by the water softener.

Step 1: Build a rather large box out of 1/2" plywood. This one is 4' x 29" x 20" (exterior, nominal).

Step 2: Build another (matching) box and install mounting rails in each so the boxes can be attached to wall studs.


Step 3: Install cleats on the wall and provide a temporary support to hold the lower box while it is screwed into the studs.


Step 4: After mounting the box to the studs, frame out the remaining two sides of the base with 2x4. The next picture shows how this will be used to provide "overkill" in terms of load-handling capacity.

Notice how my original cleats are protruding slightly beyond the bounds of the box. This was done intentionally to allow each cleat to be attached to one additional stud.


Step 5: Stack the second box on top of the first, and secure it to the studs.

Step 6: Line up a vertical support that extends to the ceiling. Cut a cross member long enough to attach to two joists, then attach the vertical support to the cross member. Verify that the assembly is level, then attach the vertical support to the base 2x4 frame of the cabinet assembly. Finally, attach the boxes to the vertical support. This support ensures that the cabinets can hold just about anything you could possibly throw at them.


Step 7: Step back and take a breather, everything is in place and leveled off.


Step 8: Try not to worry too much about any minor imperfections; it's more productive to build a face frame and hide them instead. So, that's what we'll do next...


Step 9: Cut and install the face frame. Because of my long cleat on the wall, it was necessary to notch out a piece of the frame on the lower left corner. (Unfortunately, this detail is hidden in the picture below.) Without the end grain of the plywood exposed, the cabinet not only looks better, but is more durable.

Step 10: Load the cabinet with a bunch of junk indispensable items and call it a day. 

Saturday, December 14, 2013

Attic Decking

I have finished the easy part of decking enough of the attic to more-easily maintain my AC and furnace unit, but have not designed around the challenging part yet. You'll be able to see what I mean after the first few pictures below:

There was plenty of clearance under the gas line, so creating a large zone near the entry was a matter of a couple easy cuts.
This offset step allowed me to leave the light fixture in its current location. It required cutting and notching a couple of 2x4s to provide clearance for a couple of wires. A half sheet of plywood covered the main span down to the tricky part.
The routing of these wires meant that it would be necessary to use two boards where the change of direction occurred.
There was an existing one-by near the vertical part, so that made for a natural stopping point.
Looking down from the top of the step-up. This is where I need to figure out how to make climbing, crossing, and descending significantly easier...
That 1x4 on the right is the only way to cross over to the AC unit at present. There are no hand-holds in the area, either.
 It doesn't seem that tall in this photo, but the step up from my plywood to the 1x4 is roughly two feet.
Another look at the current means of crossing over to the AC unit. If I were 12, it would probably seem fun to tiptoe across the balance beam and jump down on the other side. But, instead, I think I'll design a different solution that makes my older self feel safer and more comfortable. As always, dodging both power and low-voltage wires will be involved.

Sunday, June 23, 2013

Garage Workbench Construction

I wanted to show this sequentially, with inline images, so decided to post it over here instead of just using Google+.

Here's a step-by-step of the second phase in my construction project.

1. Cut and notch the base cabinet side panels.

2. Cut the lower front facia, and the mid and rear under-cabinet supports.  
    *NOTE*: The plywood scraps from the notches are used to confirm measurements.

3. Cut the bottom (shorter) and top (longer) of the cabinet. These parts should match the measurements of the one-by material cut in step 2.

4. Using a scrap the same thickness as the back panel, set the blade height for some rabbets.

5. Cut the rabbets on the top of the bottom shelf, the bottom of the cabinet top, and the inside of each side panel. (You could use a router to cut the rabbets, but -- as you'll see in the next step -- this method is pretty good for plywood.)

6. Since the depth of the shoulder cuts was about the same as one of the lamination layers within the plywood, it is quick and easy to clear the rest of the rabbets with a chisel.

7. Attach the back and middle supports to the underside of the bottom shelf.

8. Attach one of the side panels.
    *NOTE*: The square was used to align the nails.

9. Attach the other side in a similar manner, then attach the front fascia.

10. Nail through the bottom shelf to the front fascia to provide more strength.

11. Attach the top, then cut the back panel and insert it into the rabbets.

12. Cut the two rails and two stiles for the cabinet's face frame. Glue and nail the face frame to the plywood structure of the cabinet.

13. In order to increase clearance in the toe space, trim some material from the lower face frame before attaching this piece.

14. Congratulations, you have a base cabinet.  Lather, rinse, repeat...

15. Modern fancy laser technology helps cut two-by lumber for the bench top.

16. Cut and attach all of the pieces for the bench top. Be sure to slightly overlap the front edge of the cabinet bases, to make it look "right". Optionally, add a "backsplash" to help secure work pieces, and to keep parts from getting lost.

17. This puppy is strong enough to stand on top of. If you don't have a jointer, then you'll have to suffer the slings and arrows of minor gaps caused by imperfections in the two-by lumber. A sheet of melamine, MDF, or even some filler can compensate for this later...

18. This particular framing square makes a fine grey card for setting white balance. Include it in all your photos if you want consistent colors :^)

19. Nothing says "man cave" quite like a faux diamond plate power strip.

20. Detail from underneath...

21. If you make your cabinets as large as these, there's plenty of room to relax and fire off a selfie.


Sunday, December 09, 2012

Modular Mathematics

A friend had a question to determine the largest integer divisor that would yield the same integer remainder for three given integer values. The provided example problem was not too difficult to solve by inspection, but I wanted to know the "why" behind it (and to know that I was correct without writing a quick bit of code to prove it). If you're interested, the three given values were 364, 414, 539. 


It's tempting to start with prime factoring, but that is not the path to success in this case, at least not yet...

After spending quite some time staring at and playing with numbers, we figured out how to solve for a special case where b > a > b/2. In that case, the greatest modulus always appeared to be (b-a). But, this broke down if a < b/2. An example we used was 353, 262, and 54.  353-262 = 91. 


Checking the answer: 353 / 91 = 3 + 80/91   and 262 / 91 = 2 + 80/91


Great, but 262 - 54 = 208, so now what...  Sure it "works" with 262 = 1 + 54/208 and 54 / 208 = 0 + itself. But, not a useful exercise for the general problem.

Then we got close to the answer, looking at the intervals but not seeing their relationship, here's a teaser:

353  - 262 = 91
353 - 54 = 299
262 - 54 = 208


We were close, but got distracted because we are well trained to factor the starting vales.  I postulated that we should pull out additional multiples of 54 and see what happened.  

353 - (6 * 54) = 29 
262 - (4 * 54)  = 46


This was as big of a red herring as factoring the values themselves. We care about the bloody remainder, but if we factor, it's zero and the answer is pretty boring. It was hard to get out of this box. In our special case where b > a > b/2, it was always true that b mod (b-a) and a mod (b-a) were congruent, the following was also true in this case:


(b / (b-a)) - (a / (b-a)) = 1

In retrospect, this seems obvious, as it quickly decomposes to an identity relationship: b-a clearly equals b-a.

-=-=-=-=-=-=-=-

The benefit was that I then realized that the congruency should hold if (b/m) - (a/m) = n, where n is any integer. (And similarly, if there are three numbers c > b > a, then c/m - b/m = i and c/m - a/m = j must also be true, where i and j are also integers). 

Rephrasing using a modulo function, a mod(m) must be congruent to (a + mi) mod(m) for any integer i.


So, If b can be expressed as (a+mi), then the common modulus will be m. This means that the greatest common divisor associated with the intervals we calculated must be my modulus. So, we need to factor 91, 299, and 208: 

91 = 7 * 13 
208 = 2^4 * 13 
299 = 13 * 23


13 is the only common factor, and therefore the GCD, and therefore my modulus. Testing this solution:


353 / 13 = 27 + 2/13
262 / 13 = 20 + 2/13
54 / 13 = 4 + 2/13


Applying this methodology to the original problem:

539 - 414 = 125 = 5^3
539 - 364 = 175 = 5^2 * 7
414 - 364 = 50 = 2 * 5^2
The GCD is therefore 5^2 (aka 25) and the remainder is clearly 14 by simple inspection.


Tuesday, July 03, 2012

My 2nd Hunk of Python Code

Build (potentially useless) NMEA data from MOTOACTV downloaded CSV file:


Acknowledgement: thanks to Beni Hess' comment on a Python Recipe post for saving me days of trying to figure out the XORs for the checksums.

Also, this NMEA reference from Robosoft proved helpful in building the sentences.

Updated below, now that all the calculations are set up as functions. Final version is posted here.

#!/usr/bin/env python
import csv, time, math, operator

filename = "rawDataCsv.csv"
# filename = "miniDataCsv.csv"

# Recorded epoch is GMT, staticly setting this to CDT for now
TZoffset_hours = int(-5)
# Living without minute offsets and assuming zero
TZoffset_string = str(TZoffset_hours) + ",00"

# Function to generate time (to the second, with truncated hundredths -- close enough) and date from the recorded timestamp
def Epoch2DateTimeStrings(epoch):
    noms_epoch = str(epoch)[:-3]
    just_ms = str(epoch)[-3:]
    cut_epoch = float(noms_epoch)
    HHMMSS = time.strftime("%H%M%S",time.gmtime(cut_epoch))
    DDMMYYYY = time.strftime("%d,%m,%Y",time.gmtime(cut_epoch))
    hundredths = str(just_ms)[:2]
    time_string = str(HHMMSS) + "." + hundredths
    date_string = str(DDMMYYYY)
    return (date_string, time_string)

# Function to determine the cardinality of a coordinate (lat/long), based on its sign (+/-)
def Cardinality(coordinate, latlong):
    if latlong == "longitude":
        if coordinate < 0: cardinality = "W"
        else: cardinality = "E"
    elif latlong == "latitude":
        if coordinate < 0: cardinality = "S"
        else: cardinality = "N"
    return cardinality

# Function to convert a coordinate (lat/long) from decimal degrees to degrees and decimal minutes
def Deg2DegMin(coordinate):
    coord = math.modf(math.fabs(coordinate))
    coord_deg = int(coord[1])
    coord_min = float(coord[0] * 60)
    return (coord_deg, coord_min)

# Function to convert Latitude and Longitude to NMEA GLL format
def LatLong2Strings (latitude, longitude):
    latitude_direction = Cardinality(latitude, "latitude")
    longitude_direction = Cardinality(longitude, "longitude")
    # Latitude
    deg_lat, min_lat = Deg2DegMin(latitude)
    deg_lat = str(deg_lat)
    min_lat = str("%.4f" % min_lat)
    lat_string = deg_lat + min_lat + "," + latitude_direction + ","
    # Longitude
    deg_long, min_long = Deg2DegMin(longitude_decdeg)
    deg_long = str(deg_long)
    min_long = str("%.4f" % min_long)
    long_string = deg_long + min_long + "," + longitude_direction + ","
    # Return the strings
    return (lat_string, long_string)


def BuildNMEA(lat_string, long_string, time_string, date_string, TZoffset_string):
    # Concatenate the pieces into the sections of the NMEA GLL and ZDA sentences that get checksummed (omit the leading $ and trailing *ck)
    gpgll_string = str("GPGLL," + lat_string + long_string + time_string + ",A")
    gpzda_string = str("GPZDA," + time_string + "," + date_string + "," + TZoffset_string)
    # Calculate the checksums (just in case)
    GLL_checksum = reduce(operator.xor, (ord(c) for c in gpgll_string), 0)
    ZDA_checksum = reduce(operator.xor, (ord(c) for c in gpzda_string), 0)
    # Convert to Hex (no 0x) and pad a leading zero if needed
    GLL_hex = ("%X" % GLL_checksum).zfill(2)
    ZDA_hex = ("%X" % ZDA_checksum).zfill(2)
    # Now, put it all together into a full NMEA GLL and ZDA sentences and render them
    NMEA_GLL_sentence = str("$" + gpgll_string + "*" + GLL_hex)
    NMEA_ZDA_sentence = str("$" + gpzda_string + "*" + ZDA_hex)
    # Return the sentences
    return (NMEA_ZDA_sentence, NMEA_GLL_sentence)


ACTVdatafile = open(filename,"rb")
ACTVdata = csv.reader(ACTVdatafile)
rowindex = 0
for row in ACTVdata:
    # Don't try to grok the heading row from the CSV file
    if rowindex == 0: pass
    # Build NMEA sentences from every other row
    else:
        latitude_decdeg = float(row[5])
        ms_epoch = row[9]
        longitude_decdeg = float(row[15])
        date_string, time_string = Epoch2DateTimeStrings(ms_epoch)
        lat_string, long_string = LatLong2Strings(latitude_decdeg, longitude_decdeg)
        NMEA_ZDA, NMEA_GLL = BuildNMEA(lat_string, long_string, time_string, date_string, TZoffset_string)
        print NMEA_ZDA
        print NMEA_GLL  
    rowindex += 1           

ACTVdatafile.close()

Friday, June 01, 2012

Functions, Expressions, Formulae, and the Like

Last weekend, I participated in a lively philosophical discussion about the nature of functions. We were on the right track, but got derailed by semantics -- particularly because we didn't fully establish the concept of range, and only dusted lightly upon the concept of domain.

My friend had the basic definition right, but we were struggling with the mapping rules because we hadn't established the underlying criteria successfully. My friend correctly argued that simply restating the formula for a circle, such as x^2+y^2=r^2 into the form y=f(x) did not magically convert it to a function. So, y=sqrt(r^2 - x^2) is not a function -- but why? The concept of a 1:1 mapping was brought forward by my friend. So, I used the standard counter to that, namely that y=x^2 is indeed a function. Since values of y are repeated, why is that any different than having values of x repeated? Similarly, y=cos(x) is a periodic function in which values of y are repeated an infinite number of times...  So, what gives? My friend was right, but something critical was missing from the discussion.

You see, because we hadn't really discussed the concept of range, it was difficult to come up with a clear and indisputable response to the mapping problem. So, the discussion got tabled. But, the question still needed to be reconciled. The rigorous definition of a function goes something like this: for all x that are elements of the domain, there exists one (and only one) y that is an element of the range such that y=f(x). That is how the mapping works, but the definition looks like utter and complete rubbish in English. When I studied number theory and set theory many years ago, we would have used the following shorthand:
The rules for a function
This shorthand conveys everything in the English definition above rather succinctly. It also reveals a set of  truths upon further reflection:

  • Each x can produce one (and only one) y
  • The same value y can appear an infinite number of times, and that's totally okay.
    • (Consider the expression y=3, and you'll get there quickly)
  • A function doesn't have to make any continuous sense from the standpoint of a a single mathematical expression or formula.
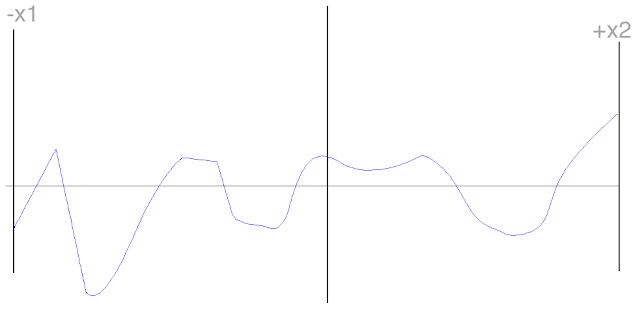
The third bullet is not necessarily intuitive, but the following abomination is a graph of a proper function that meets all of the rules:
A rather odd-looking function
In this freaky function, the domain has been constrained to all Real Numbers between -x1 and +x2. For each value of x within this domain, one and only one value of y is produced by the function. The range would be defined as the set of all Real Numbers between some -y1 and +y2 which, respectively, represent the lower and upper values that the graph covers in the y axis. So, even though trying to build this ugly graph with a single mathematical expression is highly unlikely, it meets all of the criteria of a function.

In fact, I could have made it look worse.  There doesn't have to be any semblance of "continuity" in the mapping to the range! So, you could chop the x axis into several bits, and come up with different mathematical expressions for each bit, and the resulting whole could still be a function as long as it meets the rules.  Here's an example, with a domain defined as all Real Numbers from -300 to +300:
  1. For x=-300 through x=-100, y = 7x^5 - 30x^3 + x - 40
  2. For x>-100 but <0, y = tan(x^2)
  3. For x=0 through x=10, y = -(3x^4) + 5
  4. For x>10 but <100, y = (12.345x)/6.789
  5. For x=100 through x=300, y=cosh(x)
That would be a convoluted graph, and I'm not going to pretend that I can draw it freehand in Photoshop with a mouse. But, the resultant insanity is indeed a valid function with a significantly huge range [(7 * ((-300)^5)) - (30 * ((-300)^3)) + (-300) - 40 = -1.700919 × 10^13], [cosh(300) = 9.71213198 × 10^129], and that [y=tan(x^2)] bit gets interesting all by itself (here's what it looks like from -100 to -99.9, and below is a wafer-thin slice that reaches the limits of what Google will plot!).


"...and that's all I have to say about that." 

Wednesday, December 28, 2011

Not much going on here, is there...

When I'm not brewing up a long-form post, most of my blog-like activities have shifted over to Google+. That's why you haven't really seen much here this year. The mobile G+ client is far from perfect, but it is light years ahead of the mobile Blogger clients.

Thursday, July 21, 2011

Gizmodo, your Thrive review doesn't Jive...

Gizmodo has a so-called "review" of the Thrive here:
http://gizmodo.com/5822445/toshiba-thrive-do-big-tablets-need-love-too-no


The central argument seems to be that it's not an iPad. This is, not surprisingly for an Android tablet, absolutely true. I shall now mock the reviewer's mockery in my best tongue-in-cheek, yet still righteously indignant, satirical prose. Caveat lector!


Widescreen-a-phobia!
For example, the widescreen tablet is chided for "somehow" being at once wider and shorter (in landscape orientation) than a 4:3 aspect ratio iPad. The abject horror is completely overwhelming. Perhaps all video content is formatted for the average 1950s-era TV, and this widescreen fad is about to die out. Somehow, said inherent widescreen-ness also makes it completely untenable to use the tablet in portrait orientation, where the usability is vastly superior than a 3:4 screen for most e-books, any 8.5x11 PDF pages, and even certain webpages (*cough*, like Gizmodo, *cough*) that assume that people stopped buying monitors in 1999 because 4:3 CRTs running at 800x600 are the flippin' bees knees. But, I digress... Oh, yeah, because it's narrower in portrait mode, thumb-typing is easier. That is, if you choose not to just use Swype, which is also included...


Port ability vs. portability?
The principal argument against the ports is that their presence renders the tablet "more like a PC".  As in, there's an HDMI output that allows you to plug it into your HDTV and play your movies without the need for a $100 peripheral (I'm looking at you, Apple TV). Better yet, you can plug it into your friends' TVs without having to bring along your $100 peripheral...  


Or perhaps, the criticism is levied specifically against the USB host port. After all, consider the following choice quote:
"I just know that in my entire history as a tablet-owner, I've not once cursed the gods at my lack of a USB port. Because tablets aren't laptops."


Insight at its finest, right? That USB port would enable you to plug in a USB thumb drive where your buddy has an MP3 or a photo that they want to share. It must be so much nicer to plug the drive into your computer, and use iTunes to copy onto your tablet instead of just plugging in the USB key and accessing the content -- especially when you're out and about. Definitely not the kind of thing that has any utility...


Similarly, since the SD card slot is built in, you can carry a metric arse-load of content spread across multiple easy-to-pack cards. The alternative of carrying a computer, firing up iTunes, and downloading different content to the device certainly seems more "magical" and "revolutionary", doesn't it. You're right, Brian, tablets are not laptops.  But, methinks that you shouldn't have to carry both if you want to access more content than fits on the devices's internal storage. 


Or maybe, like me, you take the occasional photograph. If you shoot on SD cards, you can just plug in your SD/SDHC/SDXC card and start browsing away -- swipe, pinch to zoom, etc. If you shoot on CF, your USB card reader can be attached just as easily. Damn, that sounds horrible, doesn't it.  I'd totally much rather sync everything into iPhoto before I can even look at it on the large high-res screen on my tablet. Oh, sorry, I forgot about that adapter kit thingy -- it looks way more convenient. I mean, who wouldn't want one of them 'donks hanging out of their dock port just so that they could read an SD card or attach the camera directly to the USB port? Samsung aped Apple in this regard, so the Galaxy tab must be awesome; oh, wait, I forgot -- it's widescreen. Game, set, and match to the iPad, for a certainty!


Convenient oversights?
In the amazingly insightful claim that the ports make it thick, the "reviewer" also completely misses the fact that a portion of the thickness can be attributed to the design decision that allows the back cover to be removed. Doing so reveals the battery which can also be -- horror of all horrors -- removed and swapped. Nobody could possibly imagine a scenario where a dock connector wouldn't present itself to recharge the battery, could they? I'll give you a hint. They could, and they have, and fairly often.


The rear-facing camera is mentioned, but not the front-facing camera.  The fact that Google Talk is fully video-enabled and enables communication with far more people than the narrow demographic that has access to "FaceTime". Heck, even those crazy open source/Linux people can use the Google Talk! The name isn't nearly as catchy, though. 


Docked for docking?
The reviewer somewhat implicitly mocks the concept of using a USB keyboard with a tablet; but last time I checked, $20 USB keyboards were more affordable than $60 bluetooth ones (which also work, including the Apple one) or proprietary $70 solutions. I mean, nobody would ever consider having their tablet docked and using a keyboard to enable things like composing a long e-mail without having to resort to the on-screen keyboard, right?


Double standards make fine double-edged swords!
While I am also not a fan of built-in apps that I can't uninstall (apart from rooting), there is no small amount of irony in criticizing Toshiba for providing their own AppVendor and BookVendor (which, by the way, are among the many available alternatives you can use, including the Android Market, Amazon, and a host of others). After all, Apple certainly doesn't -- in any way -- encourage you to purchase any content from their first-party stores. This is clearly evidenced by the fact that the iBooks and AppStore links are almost impossible to find, and can be easily removed from an iPad.

Postscript: Back to that widescreen-a-phobia thing...
I could fit three Gizmodos in one browser window! Gotta love that scrolling action, even if you ditch their crap-tacular default view in favor of the "blog" view...
Giz <3 whitespace!

Tuesday, July 05, 2011

Sync, then add new MP3s from a folder to iTunes

The "Sitch":
Like many "advanced" users, I reluctantly use iTunes because it's the most straightforward way to load my iPod. However, less than 0.01%* of my content was purchased from the iTunes store, and there is absolutely no way that I will ever allow iTunes to organize obliterate my folder and file structure. When I rip a disc, buy a $5 album from Amazon MP3, download free tracks, etc., the files get stored on a NAS, where the collection is archived.

For a while, I've been rsynching the master collection on the NAS to a local folder on the living room PC, because iTunes has exhibited poor behavior with both remote libraries (supported by my NAS) and libraries on network shares -- particularly if said share is accessed from multiple computers. (I won't go into the details, but the past issues in both of these options made a local copy highly desirable... Maybe Apple fixed all the issues I ever encountered. Maybe not. I simply don't feel like finding out.)

The Hitch:
Unlike practically every other media player in the universe, iTunes isn't programmed to fulfill the simple task of identifying that files have been added to a given folder and then importing said files into its precious little library. This meant opening iTunes and running Add to Library from its menu. There were two options: remember what you just rsynched and pick the appropriate sub-folder(s) or re-add the whole top-level folder and trust that duplicates won't be added (which generally worked.) Either way, it was manual and therefore bogus...

The Fix (for this Son of a *itch):
Enter Automator. As you can see in the top part of the (rather wide) screen snippets below, it takes a massive two steps to A.) find brand-spanking new music files in a specified folder structure and then B.) add said files to the iTunes Library. Why this has to be done with an extravagant macro-type concoction is beyond me, but the fact that is literally this trivial to accomplish was refreshing, as I haven't really messed with Automator nearly enough...

Music being synchronized to a local folder, then being added to iTunes automagically. Dogs and cats, living together! The apocalypse is nigh!!! 
After adding those two tasks to a "Workflow" in Automator, I saved it as an Application so that I could just run the bugger without opening Automator every time. The other benefit of saving as an app is that I could just add another line at the end of my rsync script and make it run by itself. That's what that little open command at the end of the script snippet above does. Note that the rsync line excludes the meta-files that are created by various OSes when the master copy on the NAS is accessed directly, and that it doesn't perform any deletions.

_____________
*: This isn't hyperbole! I have over 10k files, and exactly one track in the archived collection was purchased from the iTunes store.

Thursday, March 03, 2011

Initial Impressions on the Squier Rock Band 3 Pro Guitar

It's a Guitar!
Here's a quick and dirty flash snapshot with some even quicker and dirtier Photoshop masking, showing (Left to Right) the Rock Band 1 Strat, the new Pro Rock Band 3 Squier, an actual Stratocaster, and the Rock Band 2 Strat. The Squier's built in string mute takes the place of the neck pickup, but the bridge pickup is indeed functional when plugged into that Fender Deluxe amp that all these instruments (real, fake, and hybrid) are posing in front of.

The Guitar Pickup
So far, I've only banged out a few quick chord progressions and simple riffs. The pickup is a little noisier, and not as "hot" as either of the single coils or the humbucker in my trusty hot-rodded Strat (or the humbuckers on an Epiphone Dot Studio semi-hollow body). You have to keep the volume knob set much higher on this guy to get similar output SPL levels, because it's just naturally quieter than its cousins. I'll have to come back at some other time to figure out how to properly comment on the tone -- it wasn't offensive by any means, but it does seem a little bit "flatter" and "less interesting" than the other pickups and pickup combinations at my disposal. The pickup is passive, and you really don't want to turn the switch for the active electronics (MIDI, etc.) on when this thing is amped, unless you want an irritating fixed-rate metronome and extra noise to come through your amp.


Fit and Finish
When the UPS guy handed me the box, it seemed light to me. Upon further subjective review, this axe is indeed noticeably lighter than the Strat, but it seems extremely real compared to the 3/4 scale plastic toys. The other thing you'll notice is the sensor package on the fretboard -- it sticks up above where the fretboard would normally end, making for an interesting architecture between the nut and the tuning keys (compared to the Strat, below). The body is apparently a little bit thicker, as things at that end look fairly normal.


I haven't exhaustively tested the out-of-box intonation by playing open - octave - harmonic with the tuner in line, but it wasn't obviously off. What will require some tweaking is the string profile. To me, the strings were unnaturally aligned in a plane out of the box, making it a little more challenging than it should be to hit the 3rd and 4th strings accurately without peeking when playing the in-game tutorials. There's normally a slight arc to the strings, and because this was absent, it felt wrong trying to play riffs. Mercifully, the saddles are adjustable, and the allen wrench is included, so this should be a reasonably straightforward operation. The action is not as low as the Strat, but is not unreasonably high by any means.

The included strings feel like they may be .010s -- pretty comfortable, and they were wound very cleanly (better than I did on the Strat, for sure). As expected, the tuning keys aren't as precise as the higher-cost units I've grown accustomed to. They remind me of my first electric guitar that I had as a kid; they get the job done, but you can feel the minor spacing and slop in the gear train when trying to dial in the tuning.

It's a Game Peripheral!
The version of tablature that Harmonix came up with will take some getting used to before I'll graduate to higher difficult levels, but the fact that it tells you what you currently have fretted is already proving useful. The aforementioned super-planar string profile threw me off a couple of times, and I think it will be easier to accurately jump between strings when playing single notes once I do a little bit of adjustment. (Playing the same "riffs" from the tutorials on my Strat seemed easier.) Even in Easy Pro mode, I can tell that getting good scores at higher difficulties will require actually learning parts of the song, particularly the less-predictable solos and bridges.

I've grown used to sight-reading in 5-button Expert and Hard modes, and haven't practiced a song in a long time. It will take discipline to actually repeat sections, use practice mode, and learn songs if I want to ever play them in the harder difficulties. For single notes, the tablature is easier to try to sight-read than the Pro keyboard track is, but I haven't done much with their chord notation yet...

My normal playing position is just far enough away that I'll probably stick a USB extension cable in line with the 9' cable on the Mad Catz MIDI Pro adapter so it's not laying on the floor. The buttons on the guitar can handle all of the navigation, and the select button and accelerometer can kick off overdrive. So, you don't have to use the buttons on the MIDI adapter for much of anything in-game. The guitar shipped with a 2m MIDI cable, which would be a little long if you were clipping the adapter to a belt or the guitar strap (also included). All of my Guitar Hero and Rock Band controllers have always been wireless, so it's a little bit of a bummer to have to string the MIDI adapter across the room to use the Pro Squier.


Slides are pretty natural in the game, but there's no tremolo so folks who love their whammy bar are going to be disappointed... Also, if you try to bend a held note, the sensors will register that you're on a different string, and you'll break the note. So, no embellishment! It will be interesting to see how the game handles bends (maybe I will have to upgrade that Stevie Ray Vaughn song).

It's a MIDI controller!
Sorry, I haven't had the chance to try this yet.  Maybe over the weekend...

Thursday, February 17, 2011

Android client for Blogger

I'm just testing the Android client from my tablet. When moblogging needs supercede tweet capacity, this could prove to be useful...

Sunday, January 16, 2011

Foray into Tabletdom with the Archos 101

I picked up an Archos 101 recently.  It is one of the current generation of Android 2.2 tablets, meaning that it runs a version of Android that Google publicly poo-pooed for these larger-screen devices. So, this means that I entered into this technology relationship with full knowledge of the likelihood of the existence of warts.

That being said, Archos did some things that piqued my interest. First, the device has 16 GB onboard, and sports an easily-accessible MicroSD card slot where I currently have another 16 GB (although 32 GB cards are available and supported, they're expensive). Since I have 90-minute 720p videos that occupy less than 800 MB, this is easily adequate for media. The wide-screen form-factor, built-in kickstand, and capacity to easily render HD content are a good combination for on-the-go media consumption. The HDMI out port doesn't hurt in this regard, either.

The Killer App (for me):
More importantly than its significant media prowess is the fact that Archos included a USB Host port, and provides Mass Storage and HID drivers. This was the killer feature that made me want to lay down my 350 bones and see what this thing was all about. With the USB Host, I gain the ability to plug in a memory key, card reader, or HDD. I had one particular HDD in mind when thinking about this device, and that's my Digital Foci Photo Safe II, which always lives in my camera bag. Since I shoot RAW + JPG, I can preview the JPGs on the Archos' big screen, pinch to zoom, swipe to navigate, and do everything else the gallery allows. All of this is significantly better than the experience of reviewing images on-camera, and in many ways easier than using a netbook for the same tasks.

Other Things I Like:
  • The wide-screen form-factor makes the Archos 101 comfortable to hold in one hand in portrait mode. 
    • This is particularly helpful for web browsing, twitter browsing, e-book reader apps, and portrait-mode games. 
    • Also, in this mode, you can hold the device with both hands and comfortably thumb-type on the default Android soft keyboard. 
  • In landscape mode, the kickstand is great for table-top and tray table passive usage.
  • WiFi actually does 802.11n.
  • No 3G/4G support means no contract, ever. 
  • The HDMI output is nice to have, although I doubt I'll use it very often.
  • HD playback is smooth, and you can jump around the timeline smoothly.
  • Battery life is respectable when on WiFi and fantastic when working off-line.
    • In mixed operation, with about 40% online time I got through the whole weekend with about 20% to spare.
    • Watching 90 minutes of 720p video only sucked about 10% of the screen. (I had it set fairly dim, so it won't always be this good). 
The Dark Side:
Unlike Samsung, Archos didn't lobby Google for Market and Google Apps support. Out of the box, the following are absent: Gmail app, Google Maps, Calendar, and the "standard" Android Market. Archos attempts to bridge this by including some bundled apps and the AppsLib alternate market. AppsLib is not terrible, but it is much more sparsely populated than the normal Market. Mercifully, the community on the XDA forums has managed to close these gaps. By following the community guidance, I was able to get all of the normal Google goodness onto my tablet within hours of taking it out of the box.

Officially-sanctioned Flash support is "coming soon." The aforementioned community has fixed this, too.

Like the Galaxy Tab before it, the micro USB port on the Archos 101 is for data transfer, and not for charging. Don't forget to pack the included charger...

The default Android keyboard is too wide to use effectively in landscape mode.  If you need to type more than a single text or tweet, you'll want to go portrait mode, or use a USB or bluetooth keyboard. Swype won't install, stating that the screen resolution isn't supported :^(.

The screen looks really good, but takes some getting used to from a touch perspective. You have to be super-gentle to effectively long-touch or drag. At first, I couldn't even set up my home screens, but I quickly learned to be delicate. Dragging in games like Robo Defense is still really hard to get right consistently (but seeing the entire board without scrolling is awesome). You can see the grid that controls the capacitive input when the screen is off, and it's spaced out almost 1/4". So, while the screen is big enough to play Slice It comfortably, the input resolution can still lead to frustration.

Unlike the Galaxy Tab, scaling is on by default, so everything goes full-screen. This is perfectly fine most of the time, but can cause some content to be truncated, and the occasional misalignment between where buttons are drawn and where you actually have to press...  

Final Impressions:
If you don't mind (and don't fear) applying some community-supported enhancements, the Archos 101 is a very good device, particularly for the price-point. Although the gripe-list above is pretty long, I am in no way disappointed that I spent my hard-earned cash on this device. I love the fact that it's WiFi-only, and what this means for battery life (particularly when WiFi is off).

I picked this up before CES, and may have waited for a Honeycomb device if this weren't the case.  But, that being said, I have something fun and useful in hand right now... If I'm lucky, Archos will provide an update. If not, c'est la vie...